Pumpkin spice season is underway, meaning it’s time to ignore all obligations and focus on our Halloween costumes. Sinister themes are the only winning strategy. Vampires, witches, zombies, and werewolves embody the spirit of the holiday; spray tans and toupees do not. Originality is commendable, but strong execution is paramount to success. Assembling an outfit is thus quite the daunting task. Fortunately, technology enables a creepy option with minimal need for tangible skills; carrying around a replica of your own skeleton.
There are several ways to duplicate yourself. To my knowledge, three-dimensional printing of segmented radiological images is the least invasive method. The first step is image acquisition. If you’re lucky, you already have a set of CT or MRI images on file with your healthcare provider. If so, you’re well within your rights to request a copy. If not, you’ll need a few thousand dollars and a compelling medical reason. For those on a budget, participation in clinical studies presents a viable alternative.
In either case, medical images are digitally stored in DICOM format. These files are typically distributed with autonomous display software that’s only executable by Windows. The DICOM files themselves, however, are accessible on all platforms. The contents below pertain to an abdominal CT scan.

The files have a cryptic structure that’s difficult to navigate without prior familiarity. Fortunately, the pydicom package traverses this for us. Pointing the package’s read_file method toward the DICOMDIR allows us to generate numpy-readable image stacks for each set of images, as well as all patient and hospital metadata.
import dicom# point dicom toward the DICOMDIR directory root = os.path.abspath('images/') ds = dicom.read_file(os.path.join(root, 'DICOMDIR'))# use pydicom's iterator to parse each "IMAGE" record, appending relevant items to data dict data = {} for record in ds.DirectoryRecordSequence: if record.DirectoryRecordType == "IMAGE":# get current filepath path = os.path.join(*record.ReferencedFileID) dirs = path.split('/') key = dirs[0]+'/'+dirs[1]# parse relevant data if key not in data.keys(): data[key] = []# read image as numpy array dcm = dicom.read_file(os.path.join(root, path)) data[key]['images'].append(dcm.pixel_array)
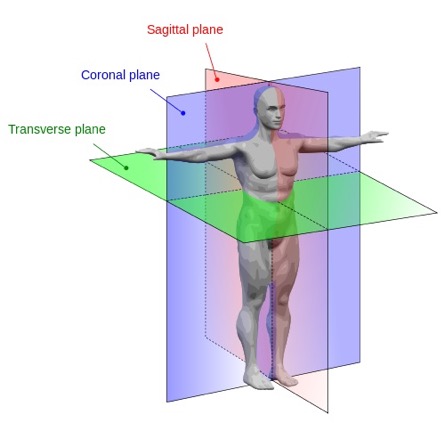
Each radiological procedure yields multiple sets of images. Images are collected across the sagittal, coronal, and transverse anatomical planes, each of which comprises its own three-dimensional image stack. While contrast and signal intensity may vary, all three orientations are suitable for skeletal reconstruction. The stack whose first two dimensions span the coronal plane is likely the easiest to work with because hips and ribs provide obvious reference points for those with only superficial knowledge of anatomy.
The next step is image segmentation. In order to render and print a three-dimensional object, we first have to separate it from its background. When observing images, we visually discern objects as apparent surfaces. Similarly, segmentation seeks to define iso-surfaces in a dense scalar field of pixels. Adopting methods outlined elsewhere, we will identify surfaces enclosing objects of interest.
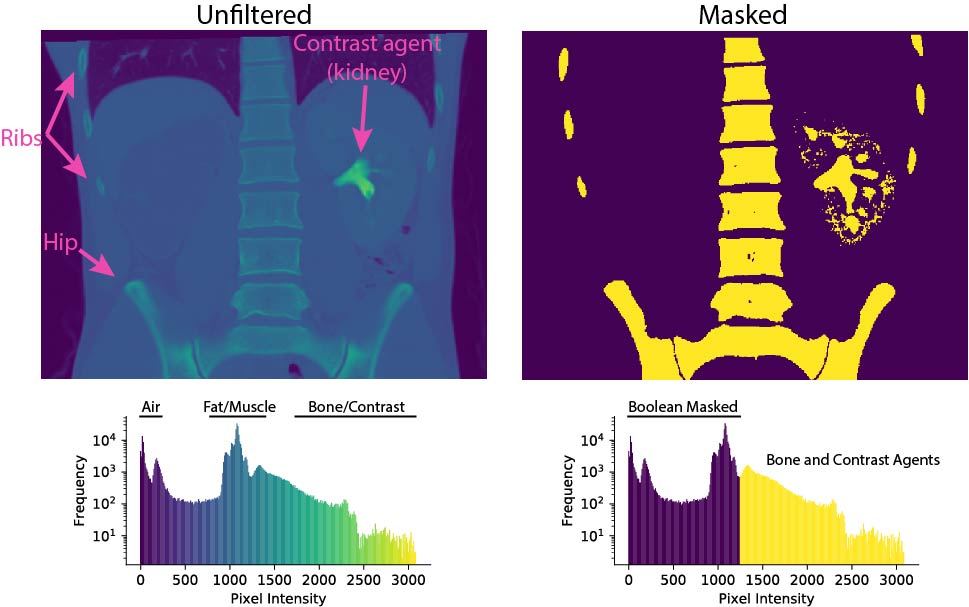
First, we must define the volume we wish to segment. Candidates include the skin, one or more internal organs, or the skeleton. In general, contrast between the target volume and its surroundings facilitates segmentation. Conveniently, CT scans use a standardized 12-bit radiodensity scale known as Hounsfield Units. By filtering images for standardized values, particular tissues and features are readily isolated. Contrast can be artificially enhanced or even converted to a binary representation. Similarly, Boolean masks can be used to isolate or neglect regions of an image. As bone exhibits strong contrast against soft tissues, skeletal segmentation is an easy starting point with minimal need for pre-processing.
Many classes of image segmentation algorithms have been successfully applied in a wide variety of contexts. One simple approach, the marching cubes algorithm, was initially designed for segmentation of tissue volumes from CT scans. A python implementation can be found within the scipy.measure module. The function returns a set of vertices and faces defining the surface mesh of interest, which can be visualized for each tissue using a Poly3DCollection.
# run segmentation and generate mesh verts, faces, _, _ = measure.marching_cubes(im, level=1200, step_size=1, allow_degenerate=True) mesh = Poly3DCollection(verts[faces], linewidths=0.03, alpha=1, color='k')# visualize mesh fig = plt.figure(figsize=figsize) ax = fig.add_subplot(111, projection='3d') ax.add_collection3d(mesh)

Similarly, we can use the create_trisurf method from the plotly.figure_factory module to inspect the segmented surface for any defects or discontinuities. The example below was cropped and downsampled because image acquisition absorbed the budget for a premium plotly subscription.

The final step is to print the segmented skeleton. The numpy-stl library facilitates conversion of the segmented surface mesh to the standardized STereoLithography (stl) file format used by most 3D printers. This approach defines the surface mesh as a collection of normal vectors and accompanying mesh vertices. Consequently, any gaps in the surface must be rectified in order to yield the water-tight enclosure needed for printing. The library also provides access to useful physical properties like object volume and center of mass via the stl.mesh.Mesh.get_mass_properties method.
import stl# Create mesh mesh = stl.mesh.Mesh(np.zeros(verts.shape[0], dtype=stl.mesh.Mesh.dtype)) for i, f in enumerate(faces): for j in range(3): mesh.vectors[i][j] = vertices[f[j],:]# save stl file mesh.save('skeleton.stl')
Home stereolithographic printers can now be purchased at less than a tenth of the cost of a CT scan, but the scale is unlikely to yield a replica large enough to solicit concern from your peers. University design facilities provide access to larger-scale 3D printing, as do some public libraries. For structural reasons, it’s strongly advised that your surface mesh encloses a single continuous volume.
How you choose to display your parts is up to you.